Introduction
We need to ensure that no matter who creates them, events are consistently entered, to present a uniform, professional appearance to the public. No matter whether you are entering details of a branch meeting, or a specialist course in DNA, all events come together on various graphical listing pages. While they can and should differ in content, they must follow a consistent style. If you follow the steps laid out in this guide, you will achieve that.
These instructions have been condensed into an Event Creation Checklist that you should print and use to check off items as you complete them every time you create an event. You can download the checklist from the Volunteers’ Corner > Events menu.
Please use the checklist – almost every error that has to be corrected after an event has been created could have been avoided if the checklist had been used.
- Use the Help system
- Use the Checklist every time
- Ask the webmasters for help if you're still not sure
Preparation
Adding a new event requires some prep work before you start to create the event. Some of these steps may require input from others, so do make sure you allow adequate time for them to respond
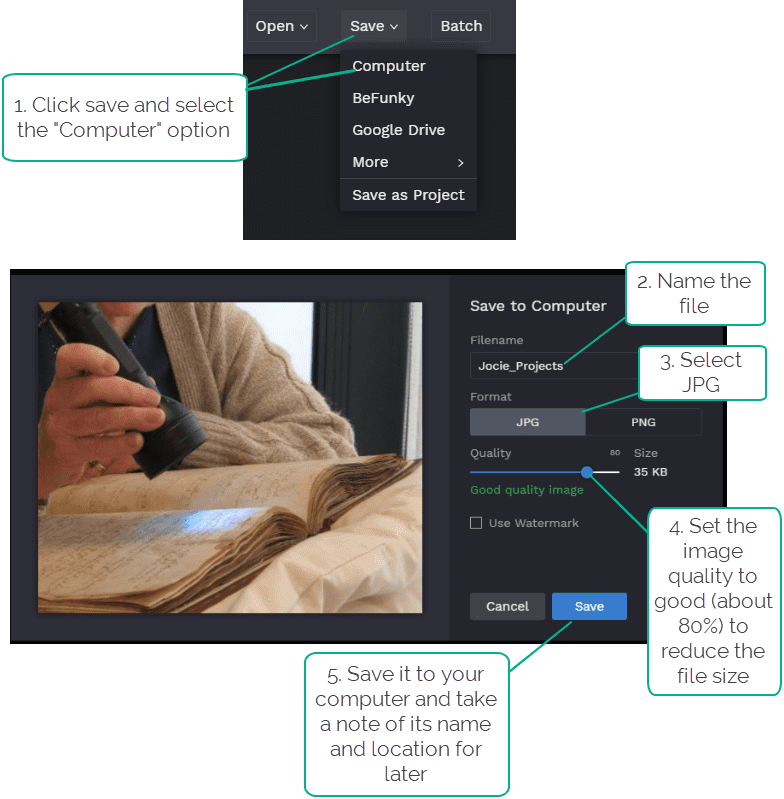
Every event needs an image, exactly 300 x 300px including a 5px shadow on all sides. This section explains how to source and edit one to meet those requirements.
Copyright
Whatever the source, all images must be copyright free or have permission to use. Do not assume that because an image is published on the internet that it may be freely copied. That is rarely the case.
Of course if you created the image yourself then you’re free to use it wherever you want. If you use it on our site you are deemed to have given your consent to for the Society to use it.
You may have access to specialist imagery relating to your event. That’s fine as long as it’s free to use.
You may want some help in sourcing an image. The Society has access to a source of professional imagery at no cost. If you preselect an image, the web team can source it for you.
Re-use
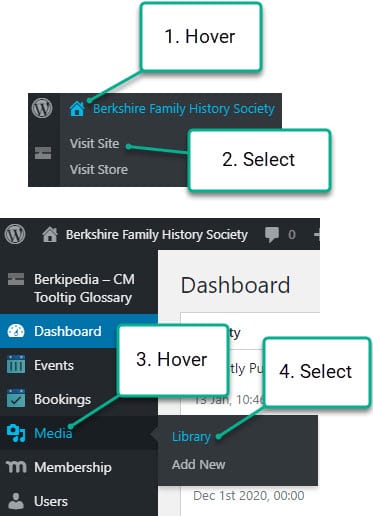
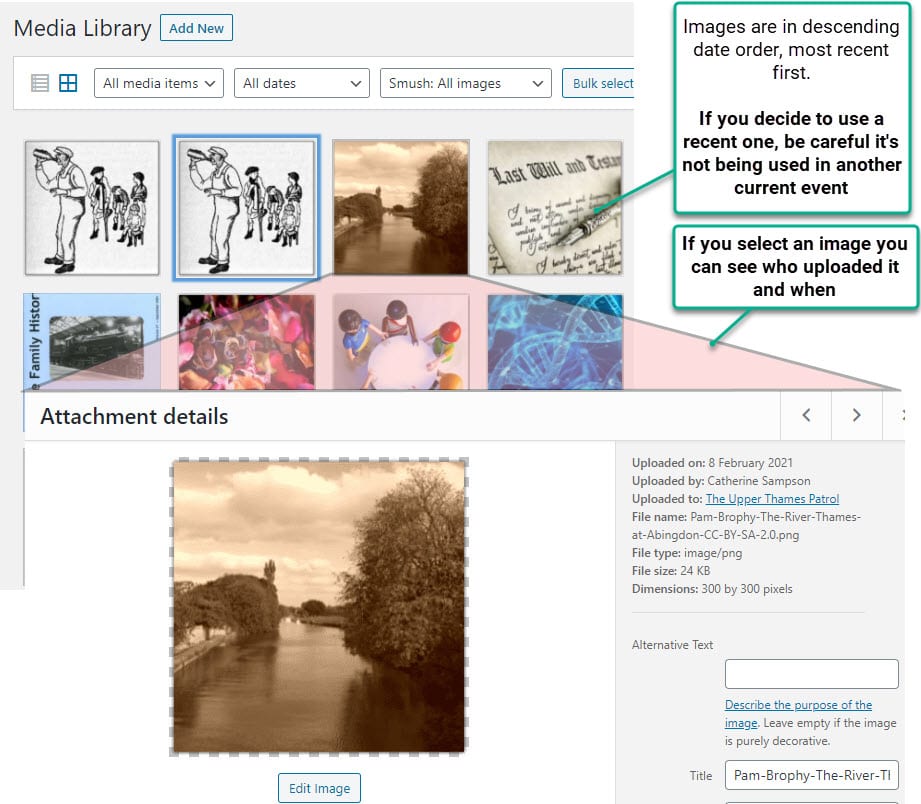
Before you look for a new image check whether there is something in the media library that could be re-used. To access it, login to the site and then follow these steps:
Find by search
- Go to depositphotos
- Use this option to search for an item by keyword. Tip: Less is more – keep your search term simple e.g. “Church Berkshire England” not “Parish churches near Reading Berkshire England”

- Tip: Don’t be surprised to see results that are way off base. Some people add the strangest keywords to their images, and the system also searches for every word in your search string independently. You can force it to match the entire search term instead by enclosing it in double quotes e.g. “Berkshire Church.” That will reduce but not eliminate the mismatches
- When the results display you will see a set of controls in the left-hand panel. Please make sure to set the following option
 … because we are not allowed to use any image that is marked “Editorial Use only,” for licensing reasons.
 - If you find an image that you like, you need to record the details (see below.)
Record the details
- Selecting the image will bring up this screen.
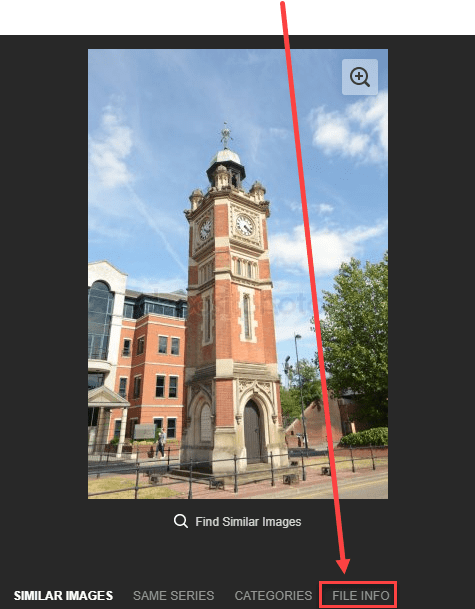
- Look for the File Info link
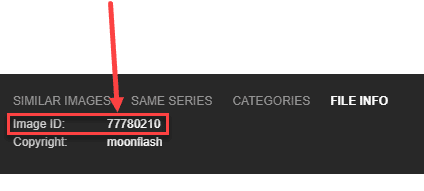
- Record that number and submit it to the web team using this contact form.
- They will source the image and send it to you. Please note: this takes a little time so please give them a few days to respond.
If you’re new to this, the difference between crop and resize needs some explanation.
Crop
You crop an image to remove unimportant parts, to make the image more relevant to your usage and to give it more impact. If you have sourced a professional image, it is probably already suitably cropped, although it still might need some adjustment for your specific need. If the image is yours and wasn’t taken for this specific purpose it may well need some cropping. Events images must be cropped square
Resize
Resizing changes the physical size of your image. So does cropping, but only by removing content. Resizing retains all the content of the original* but shrinks the size. We use our images online so the important measure of size is pixels – the tiny dots that make up your screen’s display.
*technically that’s not accurate. Resizing does discard some detail but at the small sizes we will be using that doesn’t matter in any practical sense.
Think of it as the Goldilocks principle: neither too big nor too small but just right. Too big and the server has to resize them on the fly which slows the site down; too small and the server has to upsize them and they will look grainy.
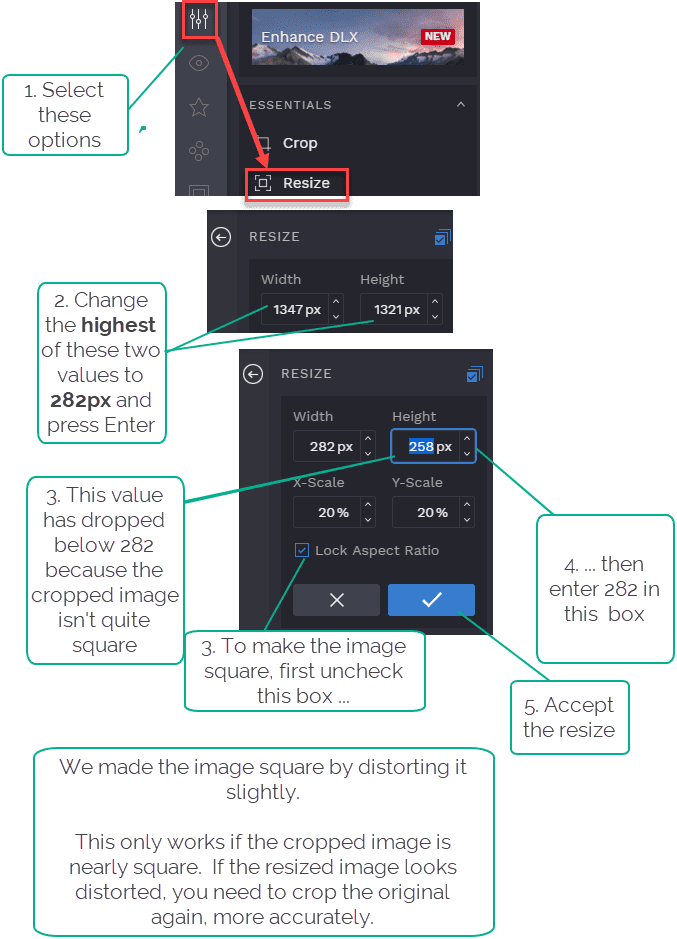
For Events, the image size must be exactly 300 x 300px
Add Shadow
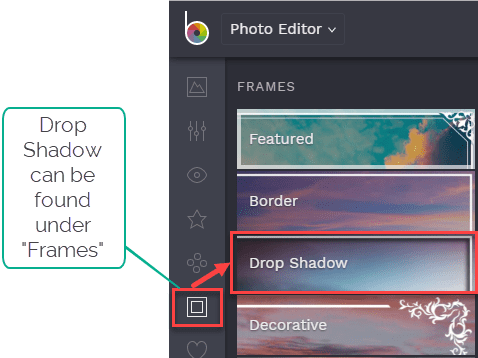
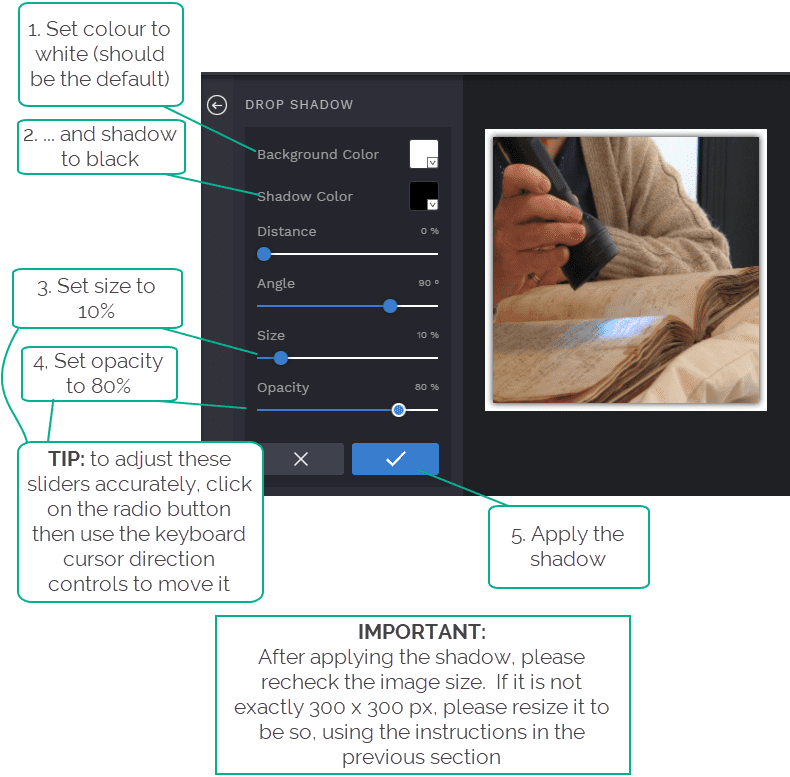
Images with a hard border can look “flat” and uninteresting. To increase visual appeal we need to make them “pop” from the page. On the previous site we achieved this by adding coloured outlines, but modern website tools allow us to produce much more subtle and effective effects. Note: the overall size of 300 x 300 px includes the shadow
There’s a simple way to do all of this
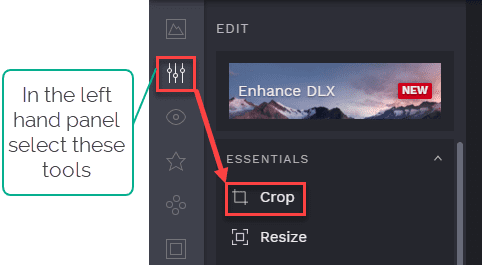
The three processes (crop, resize and add shadow) can be carried out together in one continuous set of actions in the befunky editor
 befunky is a simple online tool that will do all this with a few clicks. Click the image to go to their free online image editor, and then follow the steps below. Do that, and we’ll get the consistent images we need.
Load the image into the befunky editor
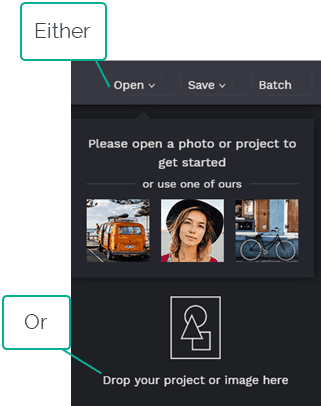
Crop to the main subject
Here’s an example. One of our volunteers examining a parish register with UV light
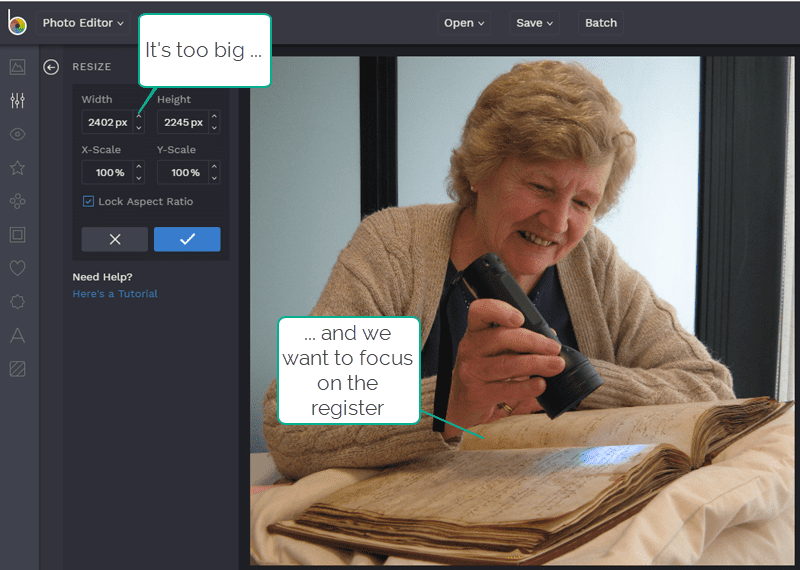
We’ll do the cropping first because that will remove pixels (px). If we resize first and then crop, we could end up to with too few px.

The grid is divided into thirds because of one of imagery’s basic concepts, the “Rule of Thirds” which is a compositional guide that photographers use.
An image has more impact if the main subjects or significant features in the image are placed along one of more of these grid-lines in either or both planes. There’s much more to it than that, but we don’t need any more for our purposes. Let’s apply it here.
NOTE: IN THE REMAING INSTRUCTIONS SOME OF THE EXAMPLE IMAGES WILL BE LANDSCAPE. SINCE THIS HELP WAS CREATED WE HAVE DECIDED TO USE SQUARE IMAGES


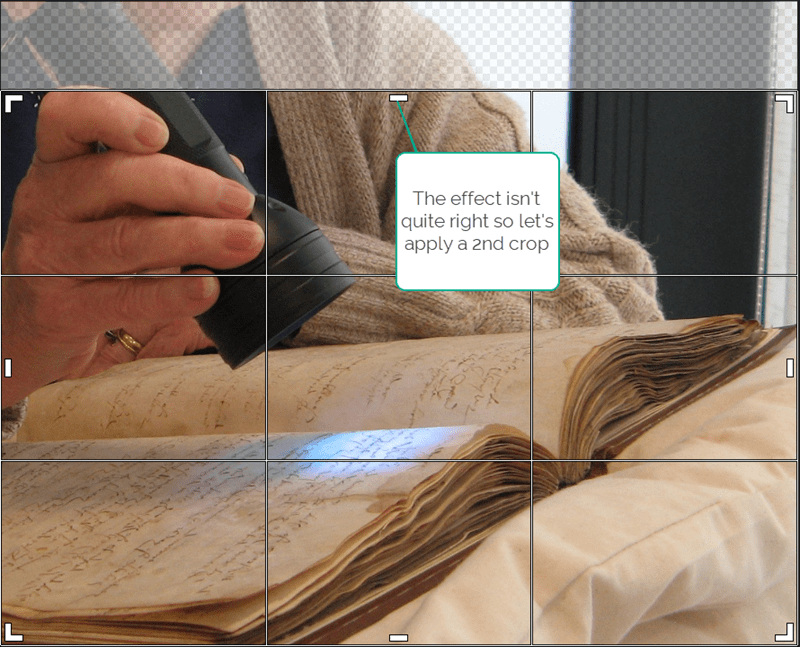
That’s better

Cropping is a subjective topic and there’s seldom a “correct” answer but if you follow these guidelines you should produce a reasonable effect. Now we need to resize it for the web because it’s still too big.
Adding a shadow has several benefits:
- It softens the hard border, making it more attractive
- When there are areas of white around the perimeter, it frames the image
- It has the effect of making the image “pop” from the page, which helps grab the viewer’s attention
Our regular venues such as the Centre and the Branch Meeting locations are pre-populated in the system.
New locations can be created on-the-fly whilst adding the event. You will need:
- Venue name
- Full address and post code
- For hard-to-find locations you will need specifc instructions (one excellent way to provide satnav instructions is to use What3Words) which is far more accurate than a post code, and far easier to use than a set of GPS coordinates (although the system will do its best to derive the best match it can from the address details)
- Accessibility information including blue-badge-parking details
Speaker bios increase the visual appeal of events listings and can cause an uptick in bookings. They don’t have to be created from scratch each time – you can use predefined ones stored in the system. If you are using a new speaker you need to ask them to provide you with their bio, preferably before you create the event, although you can add it later.
A bio should comprise a headshot photo (preferably colour) plus a couple of short paragraphs that describe what the speaker brings to the subject.
GDPR
GDPR requires the speaker’s explicit permission to publish this information. An email will suffice. But it must give explicit consent for publication. While there are fields provided for the purpose, you must never publish the speaker’s phone or email address
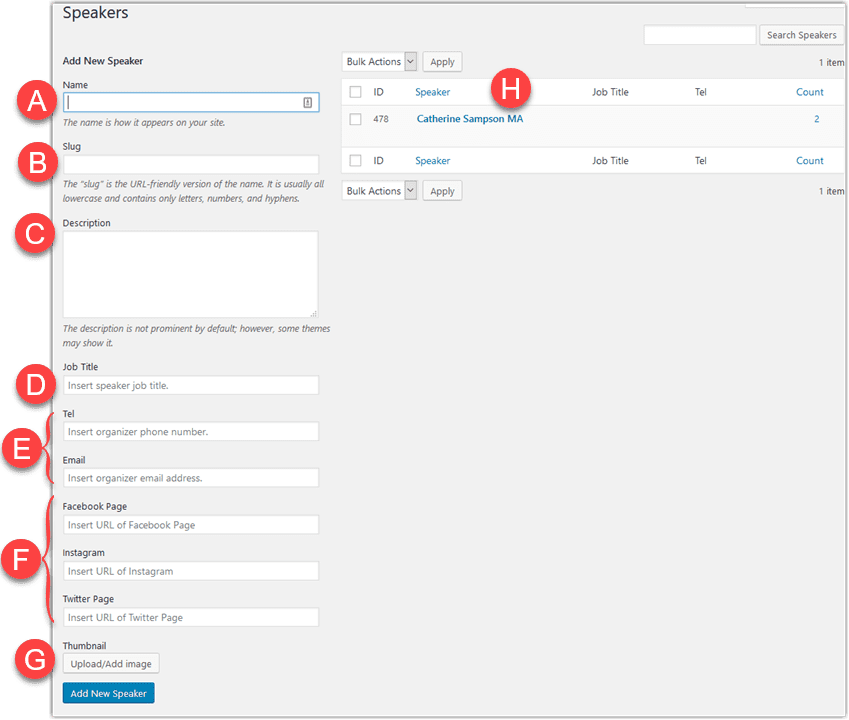
(A) Name
This is the name/title by which a speaker is known – see the example at (H)
(B) Slug
Ignore
(C) Description
A couple of paragraphs explaining the speaker’s background and expertise. They will often supply this for you. But we don’t want War & Peace – just a couple of short paragraphs, please.
(D) Job Title
This is especially useful when the speaker’s profession is relevant to family history, for example if they are a County Archivist. Whether there’s any benefit in stating a speaker’s position within the society is debatable.
(E) Tel / Email
Do not use these fields. We must not publish personal contact information, regardless of whether the speaker has consented to it, because this information can be mined by spam bots.
(F) Social media links
These are not essential but they add credibility to the speaker’s bio, and help publicise our event too.
(G) Thumbnail
This is not essential but it enhances the event listing by adding an image to the speaker’s entry. It only needs to be a thumbnail
(F) Speaker
Hover over the speaker name and a small menu will appear:
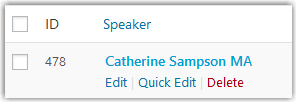
You can ignore Quick Edit. For these simple records, Edit is just as quick.
Edits will be immediately applied to all existing events associated with this speaker
Log in to the web site using your usual username and password
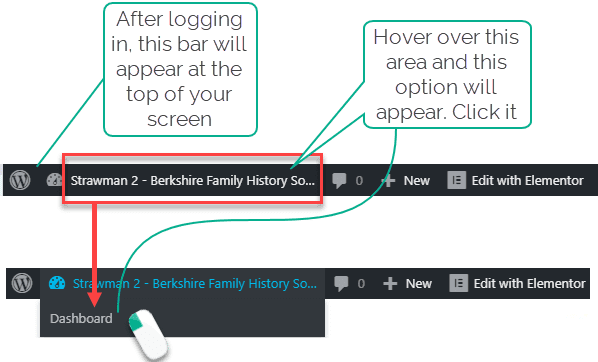
A panel will open on the left
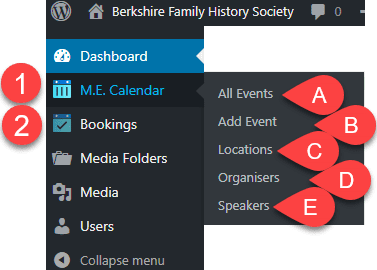
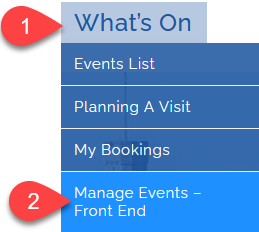
You will access:
- Modern Events Calendar to:
- Manage Events (A)
- Add Events (B)
- Manage Locations (C)
- Manage Organisers (D)
- Manage Speakers (E)
- Bookings to manage all bookings
Each of these functions will be explained as they occur in the Create-to-Booked events lifecycle.
Add an event
Intro
Creating events in the WordPress backend can be a daunting task, mainly because there are so many sections of the Events plugin that we don’t use which get in the way of the ones we do, to the extent that it can be easy to miss an important field.
Front End Submission is an alternative way of entering events that’s available in a restricted area of the public web site. It strips away the complexity by suppressing fields and sections we don’t use, and provides much more useful data entry prompts.
Access
This is the menu item. Click on the inmage now to be taken to the page (in a new tab)
The page starts with some brief instructions on how it works – there is no point in repeating those here. Little instruction should be needed anyway, because the user interface is much more intuitive. However all the regular help topics about image sizing and building the content etc apply to Front End Submissions.
Video Help
There’s a 14 minute video that demonstrates how it works
We’ll deal with event creation step-by-step, starting with the top section
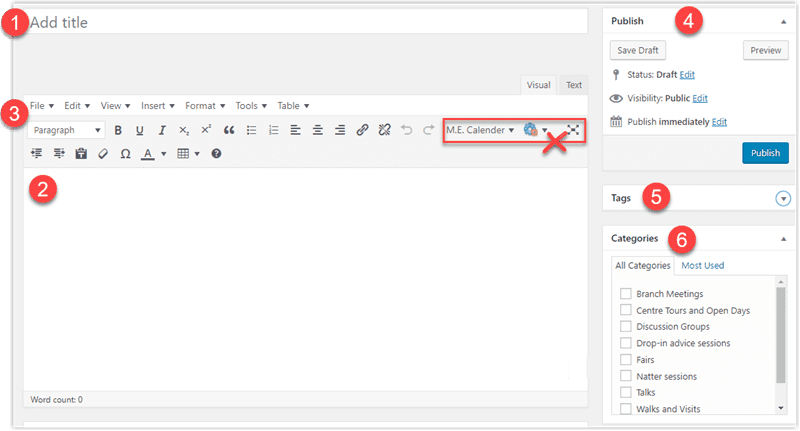
(1) Title:
Self Explanatory.
Please limit the title to just the title. Do not include details such as Speaker, Location or Date – these are all dealt with elsewhere and should not be repeated in the title. Please keep the title as short as possible – long titles adversely affect the display of events on some pages of the site.
If you’re creating a series of linked events you should add words such as “Talk 1 of 5” to the end of the title.
(2) Details
This is where you enter details of the event that are not specified elsewhere. Please do not replicate date, start time and ticket price here because it makes the entry unnecessarily complex. Note: for free events where a voluntary donation is requested from non-members, that information should be entered in this box.
Sample snippets to copy and paste into a booking:
“Non-members are requested to make a £3 donation towards costs”
“Cost is £x (£y for members) payable on the door – prebooking is not required”
Email Links
The event page where people book has a sidebar that shows the booking admin’s email address by default so people can contat us if necessary.
If that isn’t sufficient and you wish to enter an email address in the body of the event description, all you need to is enter the adress as plain text. When the event is published, the system will recognise it as an email address and will place the necessary links on it, plus an icon, and will wrap it in javascript to prevent it being harvested by email bots.
e.g. booking@berksfhs.org.uk
If you’re including the email address of an individual, please make sure you obtain their explicit written permission (an email will suffice) to publish it on our website
Hyperlinks
If you want to add a link to another page or to an external web site, you can do so in the body text.
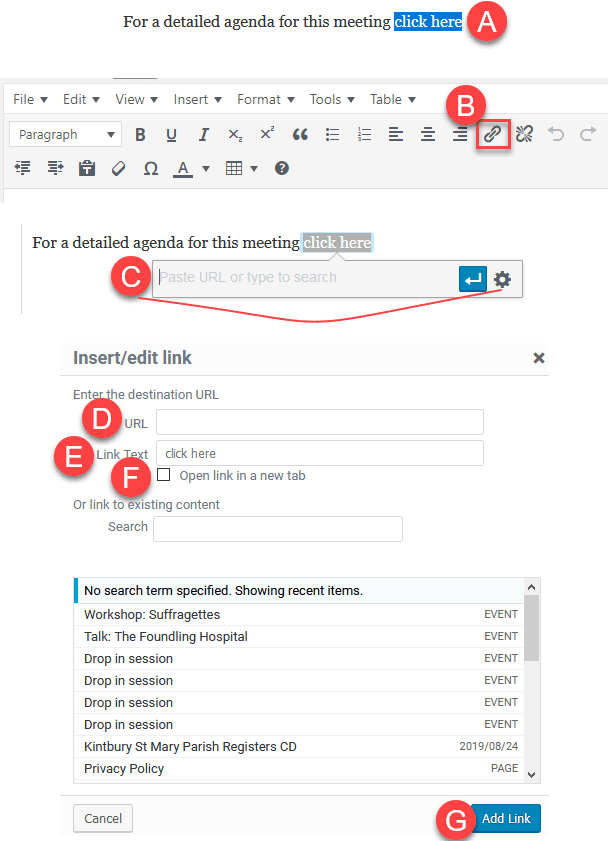
(A) First you need to write the text on which the link will be made and then select the part of the sentence which will be the linked part
(B) Then click this menu item
(C) At this point you could enter the URL and click the enter icon, but there’s a better way. Click the gear icon instead
(D) Enter the URL
(E) This is the text you highlighted, edit it here and it will update the text in the event details
(F) If you are linking to an external website you must check this box because it is good practice to open a new tab for external links, to reinforce the fact that the user is leaving the society’s site
(G) Click to create the link
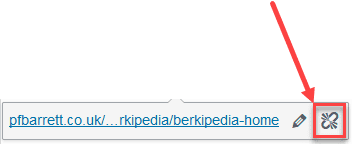
To remove a link, hover on the linked words until they change to blue and click this icon
(3) Editing Tools
A text editor is provided so you can format the details to suit your needs. Most of these controls are self explanatory and if you’re familar with Microsoft Word or Google Docs you’ll probably find everything you need easily because they use similar icons. There are some more obscure ones. Rule of thumb: If you don’t understand what a control does, you probably don’t need it. Please do NOT use the controls shown in the red box.
(4) Publish
This box contains a number of useful controls, and you will probably use Publish least of all
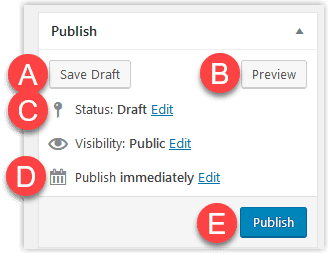
(A) Save Draft
This is self explanatory – you can save a new event in draft format and come back to it later. It’s good practice to save your event from time-to-time, just in case something goes wrong
When you are creating a series of linked events such as a series of talks or a 544 offer, this will allow you to duplicate and edit the individual items and delay publishing until they are all ready to go
(B) Preview
Self explanatory
(C) Status
You can use this option to unpublish an event. Handy if, for example, you spot that there’s an error and you need to withdraw the event while you resolve the issue. Once the issue is resolved and any correction has been made, you can republish the event
(D) and (E) Publish
By default, when you publish an event it happens immediately but if you click the Edit option you can set a future date on which you want the event to auto-publish.
(5) Tags
Ignore this section. We don’t use tags.
(6) Categories
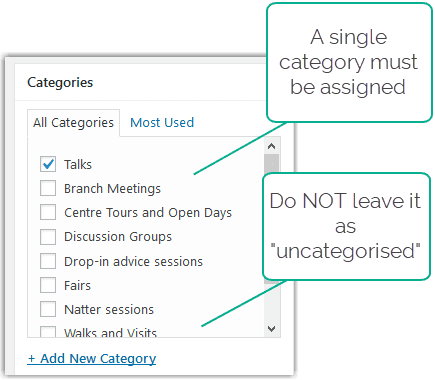
You must choose one category. If there is no valid choice in the list, proceed without it but contact the Webmaster to get one added. It can be entered later. Please don’t create them yourself – your events won’t appear on the homepage, for example, if the category is not one of the the predefined ones that drive the homepage carousel
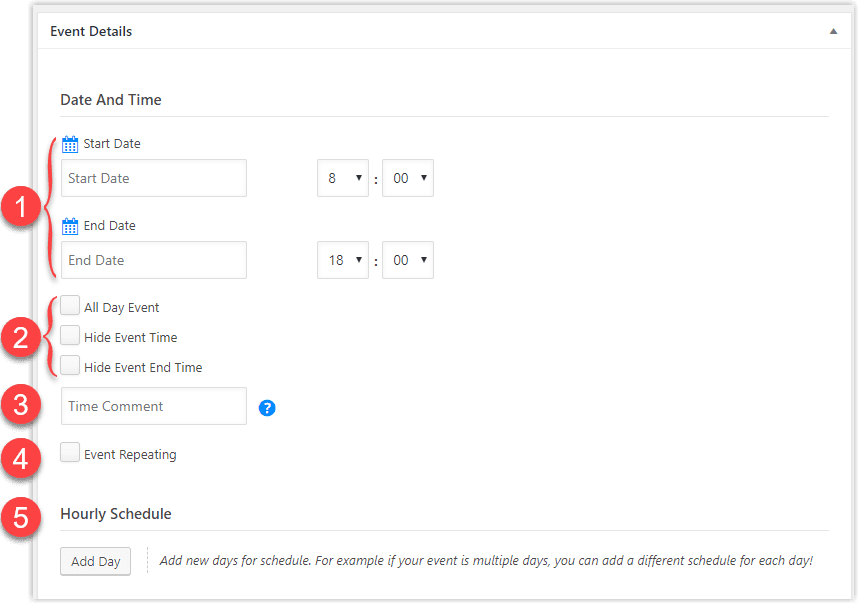
(1) Start and end date / time
This section is straightforward – click on the relevant fields to use the calendar or drop downs to choose the date and time.
Beware!
If you pick a future month for the start date, the end-date calendar does NOT move forward automatically to use the same month. You have to move it forwards manually.
(2)
Please ignore this entire section. None of these options are needed in our situation.
(3) Time Comment
This is a good place to enter a comment such as “Doors open at 7:15 pm”
(4) Repetition (recurrence)
Normally you must ignore this option.
Exception: There is ONE situation in which this option could be used BUT it requires all the following to be true:
The speaker AND event details AND agenda AND time AND everything except the date need to be identical for each recurrence.
There’s a separate section on recurring events – please see the Advanced topics below
(5) Hourly schedule
Ignore this section. It is only useful if you are, for example, running an all-day event which has a timetable of talks
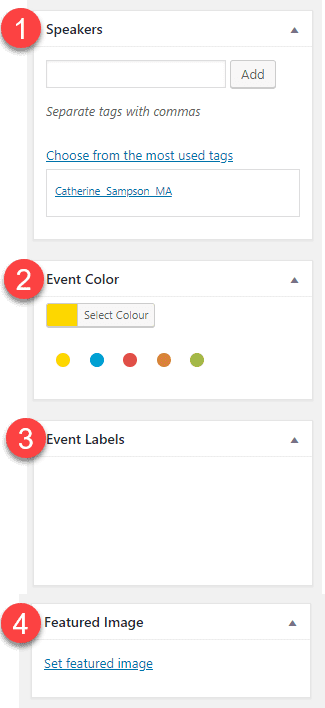
(1) Speakers
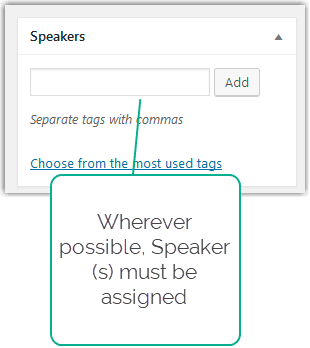
Bios help sell an event to the customers. If you have speakers at an event, you can select one or more and their bio will be added to the event automatically.
If you use a new speaker you should have created their bio in the preparation steps above. But if you forgot, you can add the speaker name here and edit the Speaker Records later to add the bio details
(2) Event Colours and (3) Event Labels
Ignore both of these sections. We don’t use either of them
(4) Featured Image
This is where you add the image that you created during the preparation steps (see above). Click on “Choose file” and navigate to the place where the file is located.
Alternatively, if you wish to use an existing image you need to navigate to it in the media library and select it:
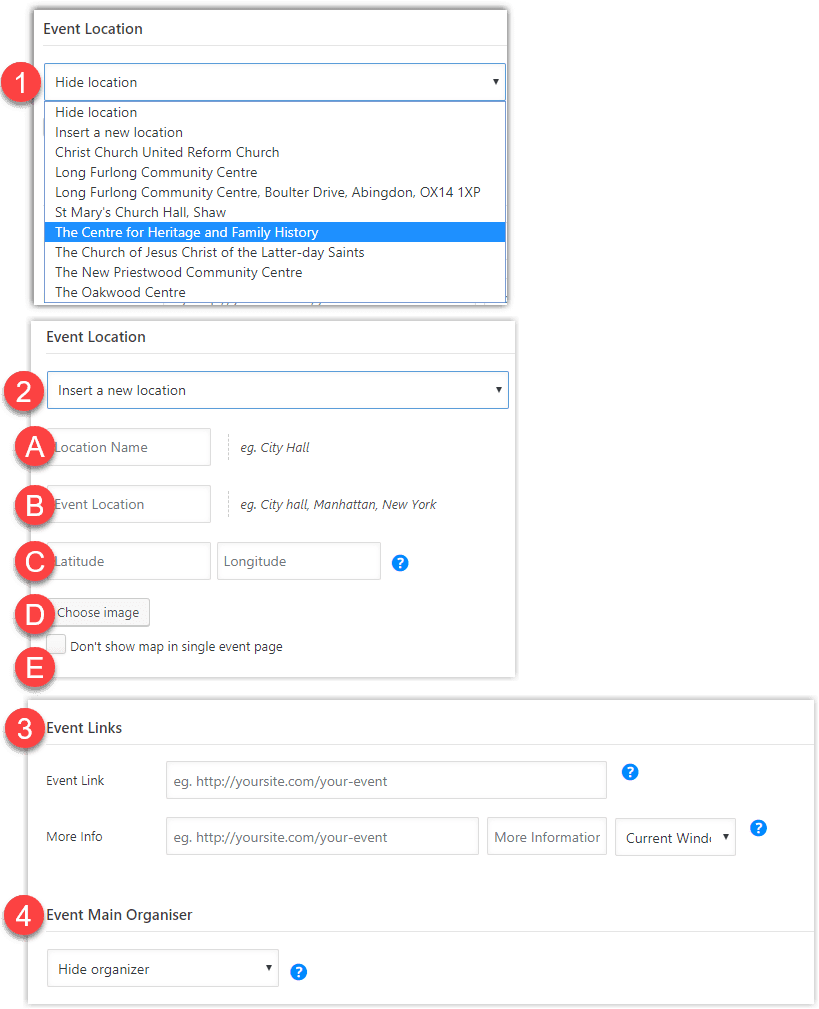
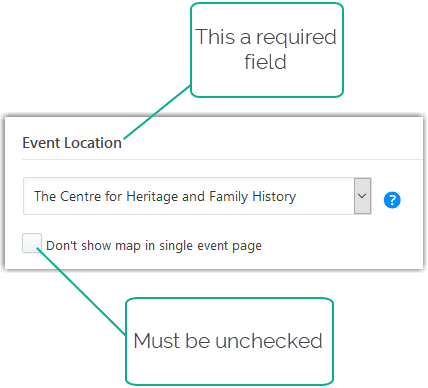
(1) Event Location
You must add a location to to every event. The Centre and the Branch locations are all available in the dropdown.
(2) Add New Location
If you select “Insert a new location” from the drop down list some new fields will appear:
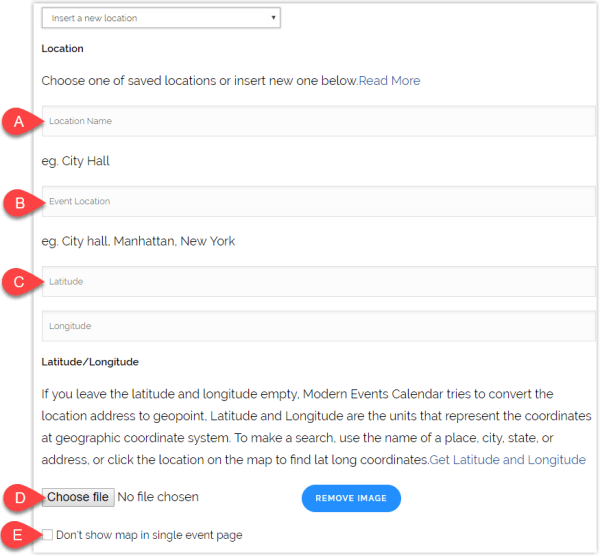
(A) Location Name
Self explanatory.
(B) Event Location
Self explanatory. Please enter the address as one line of text with the elements separated by a comma and space, and include the postcode and county e.g.
The Centre for Heritage and Family History, 2nd Floor, Reading Central Library, Abbey Square, Reading, Berkshire, RG1 3BQ
(C) Latitude and Longitude
If you enter the full address in teh format specfied above the system will determine the geoloaction for you. You only need enter the coordinates manually when the postcode isn’t sufficiently accurate. This is especially true of rural and hard-to-find locations
(D) Choose file
An image of the location’s exterior helps delegates identify they have reached their destination.
(E) Don’t show map in single event page
Always leave this box unchecked
If you add a new location, please tell the webmasters so they can ensure the event is displayed correctly on the various pages on the site
(3) Event Links
Ignore
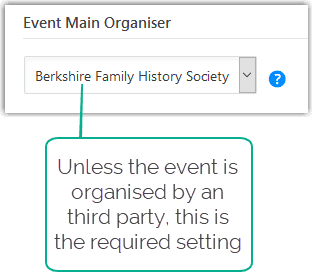
(4) Event Main Organiser
Choose from the pick list
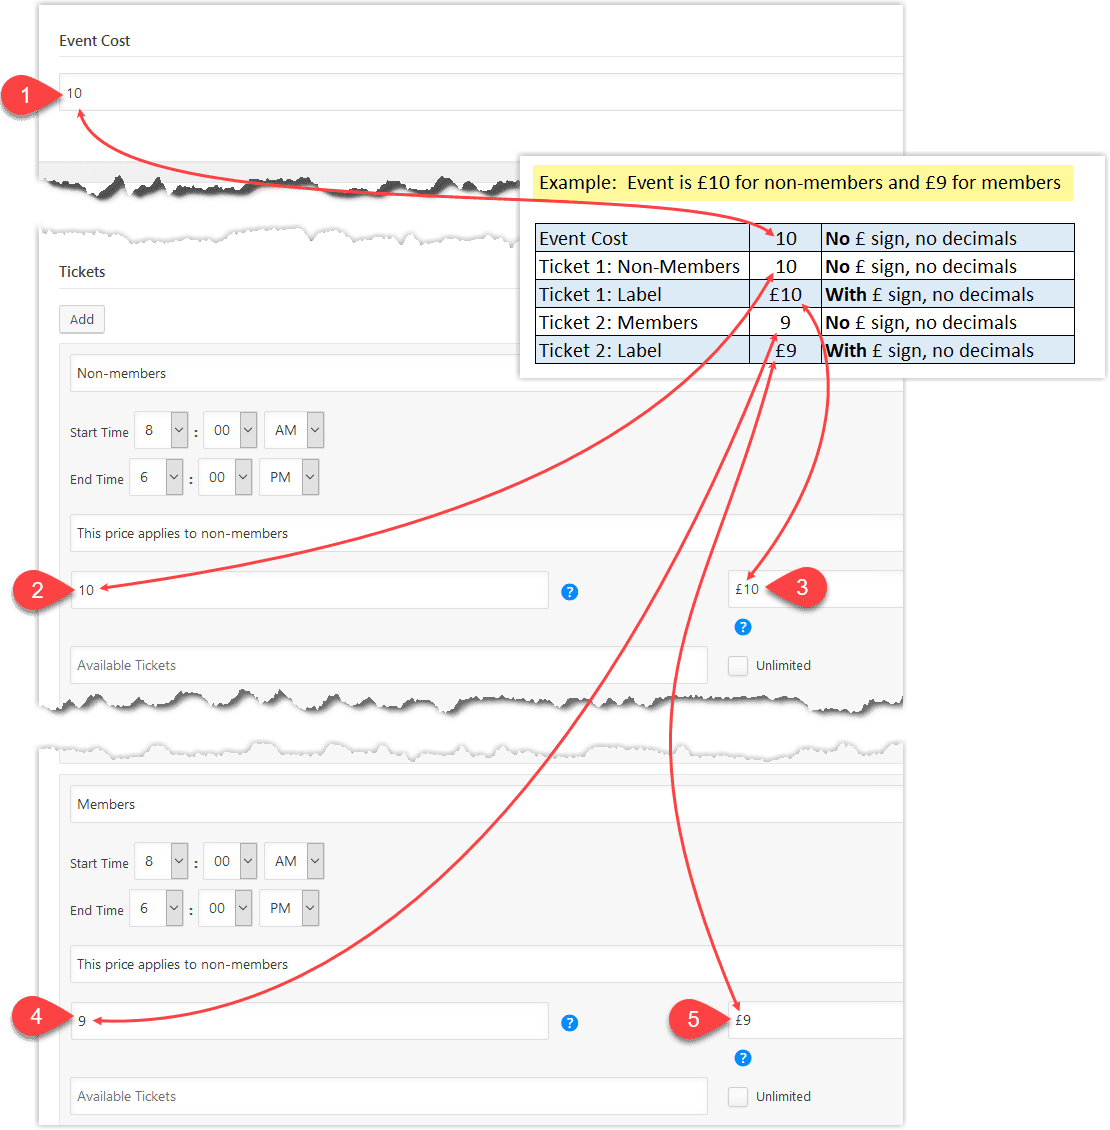
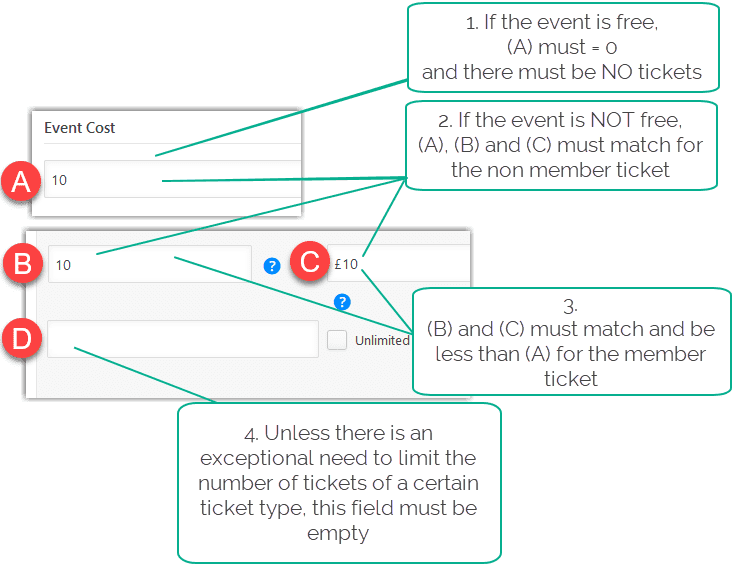
There’s an important principle that has to be observed for every paid-for event. There are multiple places where the event prices are entered, and they must use the correct format:
- Event Cost is a headline figure that appears in the Event Page to publicise the event. It is a numeric figure – no £ sign, no decimals unless the event is priced in decimals. The system will add the £ sign when it displays the event to the customers.
- Ticket Price is the price of an individual ticket and is used in shopping basket calculations. It is also a numeric figure – no £ sign, no decimals unless the ticket is priced in decimals
- Ticket Label is the ticket price displayed on the bookings page and includes the £ sign
Most paid for bookings will have member and non-member tickets. Therefore there will be a second set of Ticket Prices and Labels. Here’s a worked example:
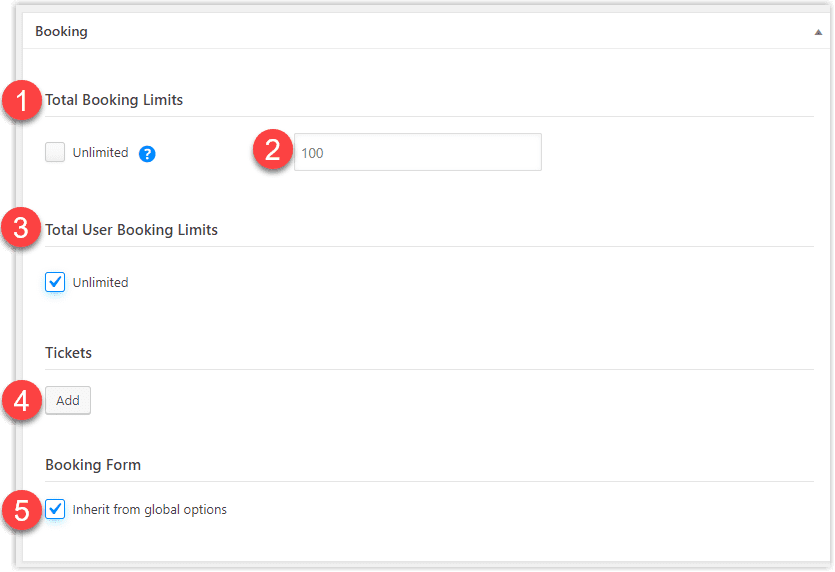
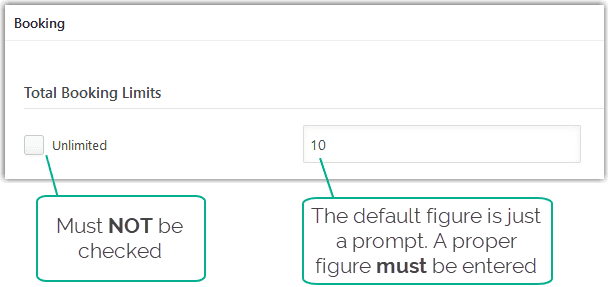
(1) Total Booking Limits
From Health and Safety and practical perspectives, venues/events have occupation limits and you need to enter the overall limit in the box provided. The default figure of 100 is just a prompt. It has no effect and must be overwritten with a real number
(2) Total User Booking Limits
You can ignore this section. It’s purpose is to prevent an individual user from booking too many tickets – not a problem that we have!
(3) Tickets
Normally every paid-for event will require 2 ticket types to be added:
- Non-member
- Member
To add a ticket click the Add button to reveal this new section of the form. Tip! You need two ticket types so press the button twice now. That way you won’t forget to add the second ticket when you have finished the first.
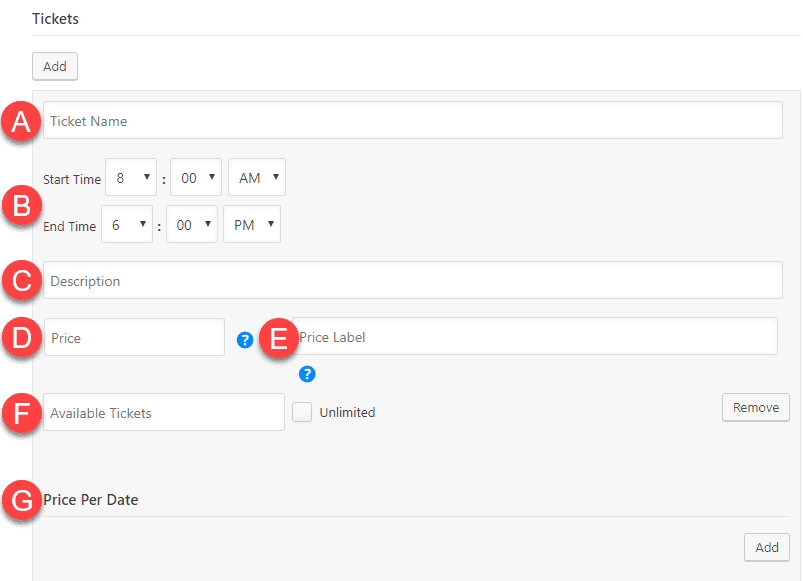
(A) Ticket Name
A short name for the ticket type e.g. Non-members or Members
(B) Start and End times
Self Explanatory. Remember this is the meeting start and end times. Doors opening and post meeting coffee times would be handled in the event details
(C) Description
This is a longer description of the ticket, to explain it to the customers. Please use these examples (copy and paste or type)
“For non-members, including members’ guests”
“Members only. Members may select a ticket for themselves, and a second if the other member of a family membership is attending”
(D) Price
This is a numeric value used to calculate the total price, for example, so it’s numbers only in this field and no £ sign. Decimals are only required if a ticket price includes them.
(E) Price label
As the name implies, this is where you enter the price including the £ sign. This is a text field that is used to display the £price at various places.
(F) Available tickets
This field should be ignored. It would only be used if you wanted to limit the number of tickets for a ticket type. But we are happy to fill a venue with whatever mix of members and non-members we can attract, and Total Booking Limits handles that.
(G) Price per Date
Ignore this field.
Repeat steps A to G for the second ticket
(3) Booking Form
Inherit from global options should be pre-selected. If it isn’t, select it. Please do NOT attempt to use a different booking form. If you believe you need to use a different one you must contact the webmaster.
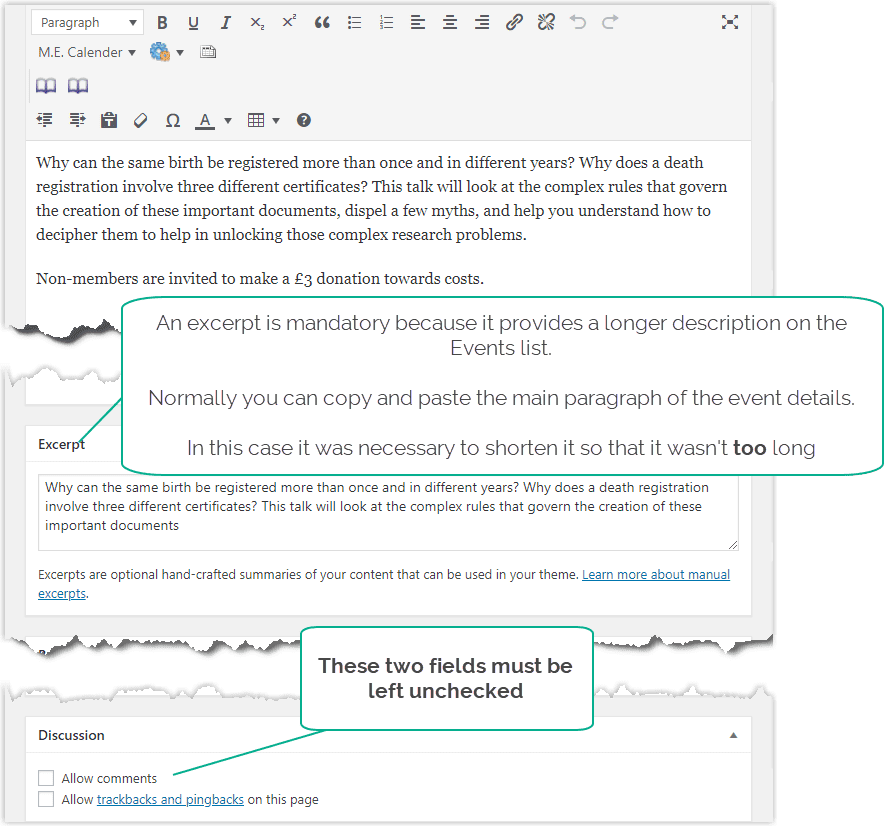
Update: Excerpts are the text that sells the event. Don’t skimp on them. 35 – 40 words is about right. Too few and you won’t sell the product very well
Ready to publish?
Before you publish, please go back and carefully check your entries. Changing them prior to publishing is easy – after the event is not inherently more difficult, but if bookings have taken place, you may need to contact the customers to provide amended details.
Particular things to look for include the correct setting of the price fields:
- Event cost: Required. Numbers only, decimals allowed if needed
- Ticket Price: Required. Numbers only, decimals allowed if needed
- Price Label: Required. = £ sign followed by Ticket Price
- 2nd Ticket Price: Required. Numbers only, decimals allowed if needed
- 2nd Price Label: Required. = £ sign followed by Ticket Price
CheckList
Here’s a complete checklist of critical items that need to be correct. We already covered all of this above, but there’s no harm in a represe:
Event Location
Event Main Organiser
Event Cost, Ticket Prices and Ticket Booking Limits
Total Booking Limits (i.e. for the whole booking)
Publish
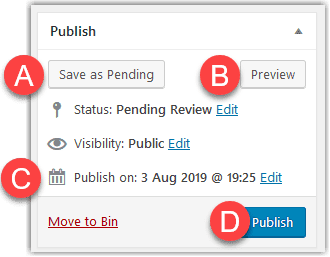
(A) Save as Pending
This is how a pending event’s status is shown. You can continue to save it in this form until you are ready to publish
(B) Preview
Self-explanatory
(C) Publish on
Allows you to set a future auto-publish date, useful for linked events that you want to co-publish.
(D) Action Button
The button text will vary accoring to other options that you have selected but this is where you confirm the required action, and Publish does exactly what it says on the tin
Categories
Speakers
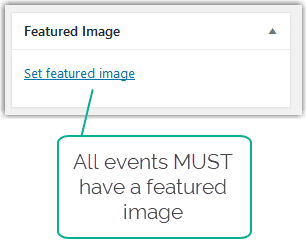
Featured Image
Facebook does not allow third party applications to post events directly to Facebook so if you want to publish our event there as an event, you have no choice but to reenter the details as a Facebook event.
But there is a way to quickly and easily post details of an event to the Berkshire Facebook page. You simply post it as a normal Facebook post instead. And the process of doing so is simple too:
- After the event is published on our site, go to the event listing and select the event so that the single event page is visible
- Go to the browser address bar and copy the URL
- Switch to the Facebook page
- In the Create Post box at the top of the Facebook page, paste the URL
- Facebook will fetch a preview of the event from our site
- Press Post
That’s it, job done. Facebook will now have a post that looks like this:

- If a facebook user clicks on the post they will be taken directly to the booking page on our site.
- If the event details change, the Facebook post will not need updating.
You just post the URL there too.
Introduction
- Individual events for each of the five talks, individually priced with non-member and member prices, so that they may be booked individually
- A separate event for the 544 ticket offer with non-member and member prices so that the series can be booked as one
Capacity
There are several other tweaks that we have to make to the process, to manage the overall capacity
- The event capacity of the first talk set to 35
- The 544 event capacity is set to 15
- The bookings for 544 are monitored and when 544 gets close to sold out, the BA adjusts the 544 capacity up, and Event 1’s down, to create aditional 544 capacity without exceeding the 50 seat venue capacity
This means that
- At any time, the capacity on the website is accurate and can be relied on
- Because the 544 event has the same date as the first individual event, as soon as that date passes it drops off the events calendar and is no longer available for booking, without anyone having to take it down manually
- Thereafter, we know exactly how many people have booked for the 544 option and can adjust the total booking limits downwards for the remaining 4 events by the 544 bookings’ number.
Duplication
The simplest way to create the six events in a 544, is to create the first event in the series and then duplicate it to create editable clones that can be tweaked. The Duplication Process is described in the next section.
Advanced Event Topics
This master listing of all events is where the majority of the day-to-day tasks are carried out, by acting on a individual item, or selecting one or more items for bulk action.
All Events List – Page Format
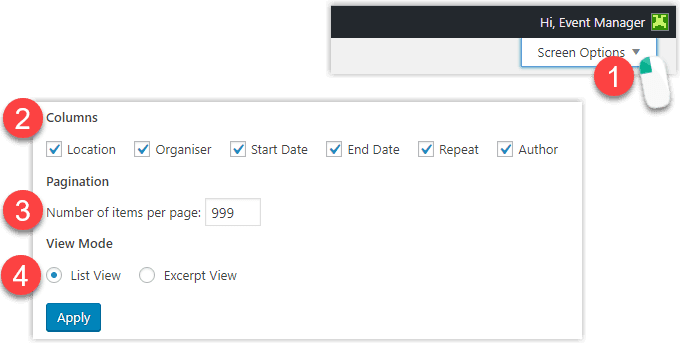
You can change the layout of the listing page to suit your working needs, and the following settings are recommended (see screenshot and notes):
(1) Screen options
Click here to reveal the options
(2) Columns
Select All
(3) Pagination
You will find a much higher number will result in fewer pages and make it easier to see events at a glance. Choose what suits you best – 999 rows is the maximum.
(4) View Mode
Use List View because we don’t apply excerpts to our events, so that view will be meaningless.
List View
When you are in list view you can take actions on individual items using the small menu that appears when you hover over an event name or you can select one or more items using the check boxes on the left and apply bulk actions to them.
Duplicating events is useful when you’re creating series of events such as Branch Meetings, Talks or 544 offers.
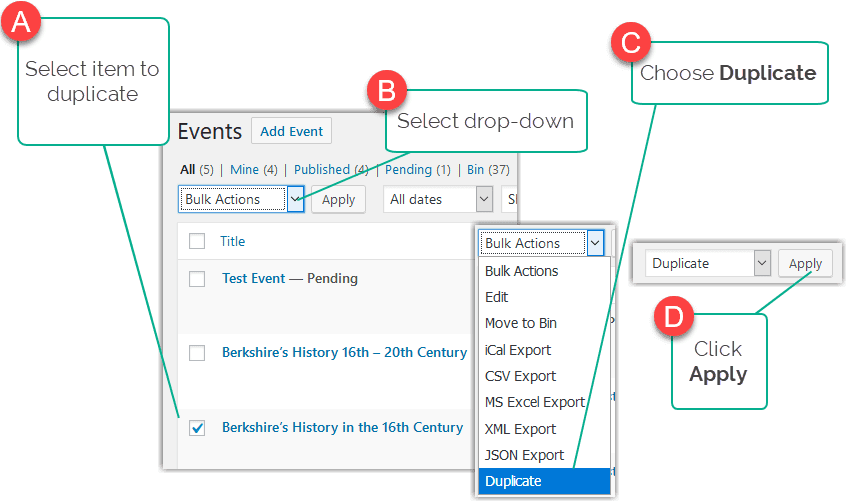
After you have duplicated the event you will need to edit the duplicate(s) to tweak the dates and details. You can keep them all in draft or pending mode until you are ready to publish them
One the most important tasks is the publishing of pending events so they become visible to the public. Event Managers can self-publish as part of the process of creating an event, but teh task can also be carried out independently. You can do them one-by-one (which allows you to check each one prior to publication) or en bloc. You can also review them individually and publish them en bloc.

You can identify which line items are pending from the label that is applied to each one (A) but they may be interspersed with published items.
To quickly filter the view to select only Pending items, click on the link shown at (B)
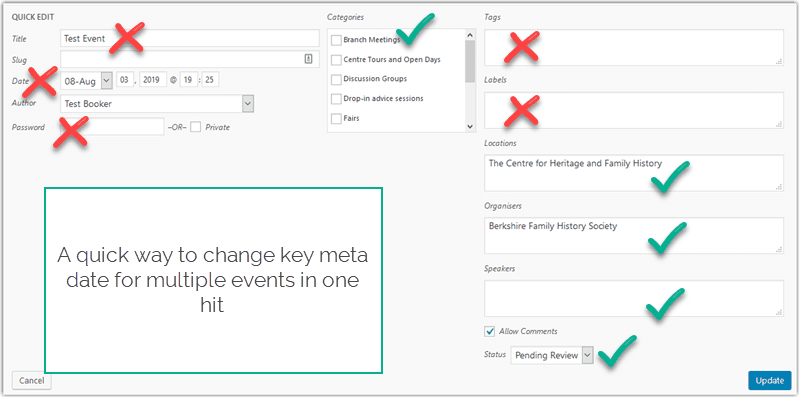
The Edit option allows you to perform an edit on any part of the event information before or safter publication. The screens operate in exactly the same way as the initial event entry screens, as described above.
Bin does exactly what it says and moves Events to the bin, which means they are no longer published. They are not just invisible because they have expired, they have been moved to the trash can. They can be restored from there if needed but, neverthless, extreme care should be taken when using the Bin option.
(Note: items in the bin can be permanently deleted, but this task is best left to the webmaster)
Does exactly what it says and allows you to preview the current edited version through the front end without publishing or updating it (based on current publication status, pending or published)
You’ve entered a new event. You thoroughly checked it before you published it, but when you view the event you see an issue with the image. Maybe it’s the wrong size or you forgot to add shading? Here’s how you subsitute a new for old image.
Right proportions, just too big?
If the image is the correct proportions i.e the height and width in px are the same, but, it is too big (>300px) you can fix it directly in WordPress without having to use any external tools or replace the image at all:
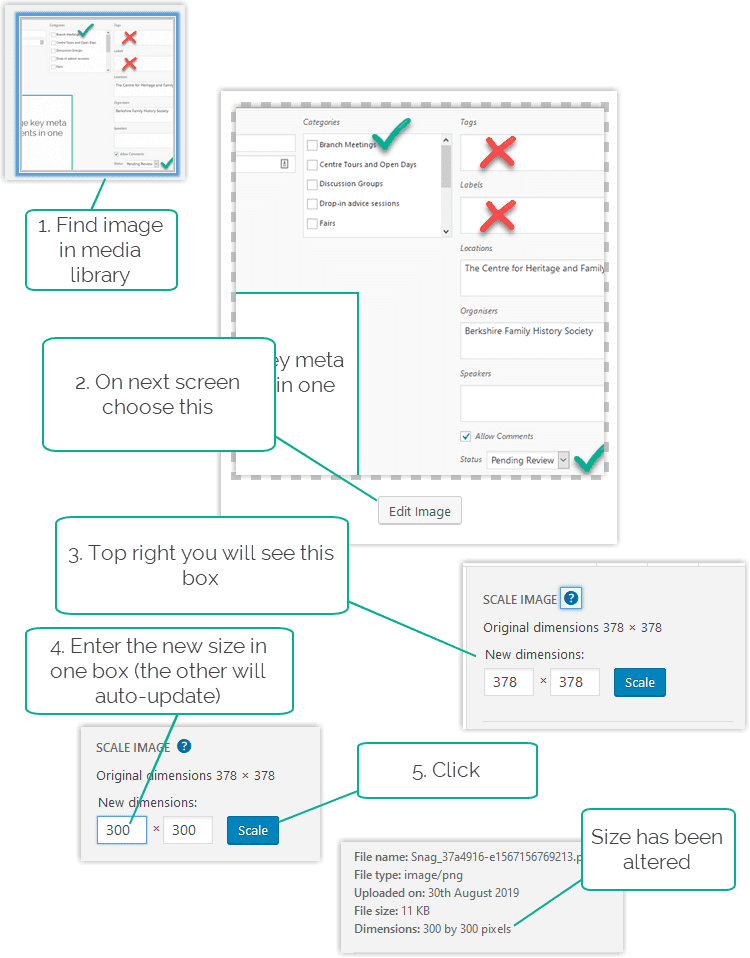
Replacing a Featured Image
To replace a Featured Image that has an error:
- Create the replacement image
- When you do this you MUST give the replacement file a different name to the original, even if it is only adding -1 or -2 to the end of the name. If you don’t the replacement will be seen as a copy of the original and will be ignored
- Edit the Event
- Select the featured image
- Delete the orginal
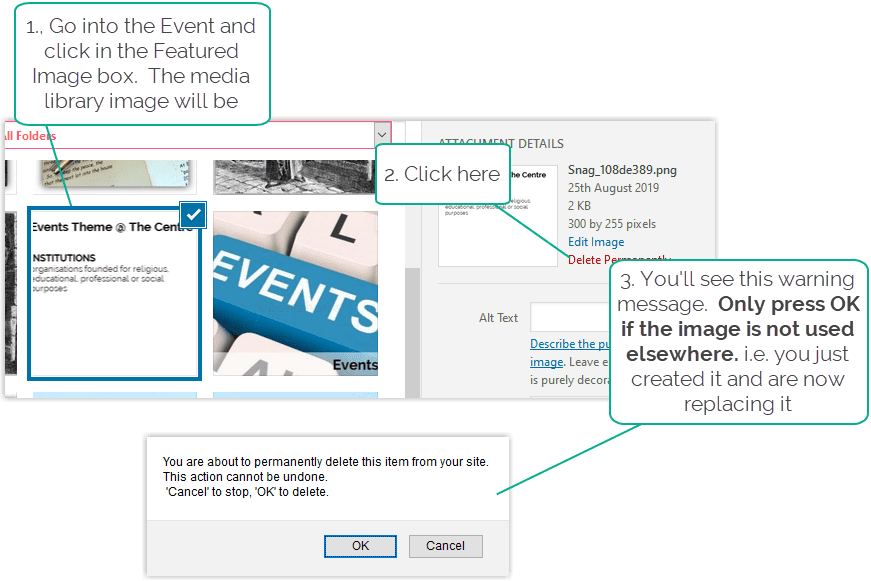
- Upload the replacement
Deleting the original image is an important step, without which the media library will become cluttered with unused images. They will use capacity on our hosting plan that could result in having to pay more.
Recurring Events
Events that repeat can be set up as a recurring (or repeating) event, in which case only one event is created but a recurrence pattern is defined so that it appears multiple times in the What’s On listing. It’s especially suited to events like the Advice Clinics which occur on set dates such as the 3rd Thursday of the month, although other patterns are available. For example, the YourTrees workshops occur at irregular intervals and at different times of the day but, because everything else is the same, a recurring event is used. Specific occurrences in a fixed pattern can be skipped, for example, if the day coincides with a public holiday.
There are some conditions that must be met to qualify for a recurring event.
Conditions to qualify
- Core elements of the event must be the same. To be clear, this means that the following items cannot vary from occurrence to occurrence, because a change to any of them will affect every occurrence in the calendar:
- Title
- Location
- Cost
- Description
- Speaker
- Organiser
- Image
- That said, if a change applies to every future recurrence, you can edit it. So for example, if you need to add details to the description or change the ticket or location, you can do so.
These conditions make the recurring event type unsuitable for example, for Branch Meetings and the Potpourri Sessions, where the topic and speaker vary between occurrences.
How it works
It is probably best to get assistance from the webmasters if you want to set up a recurring event, because everything has to be just so for it to work, and you won’t be creating them frequently because they tend to be fire and forget.
This is how to set up a recurring event – see explanatory notes beneath the image:
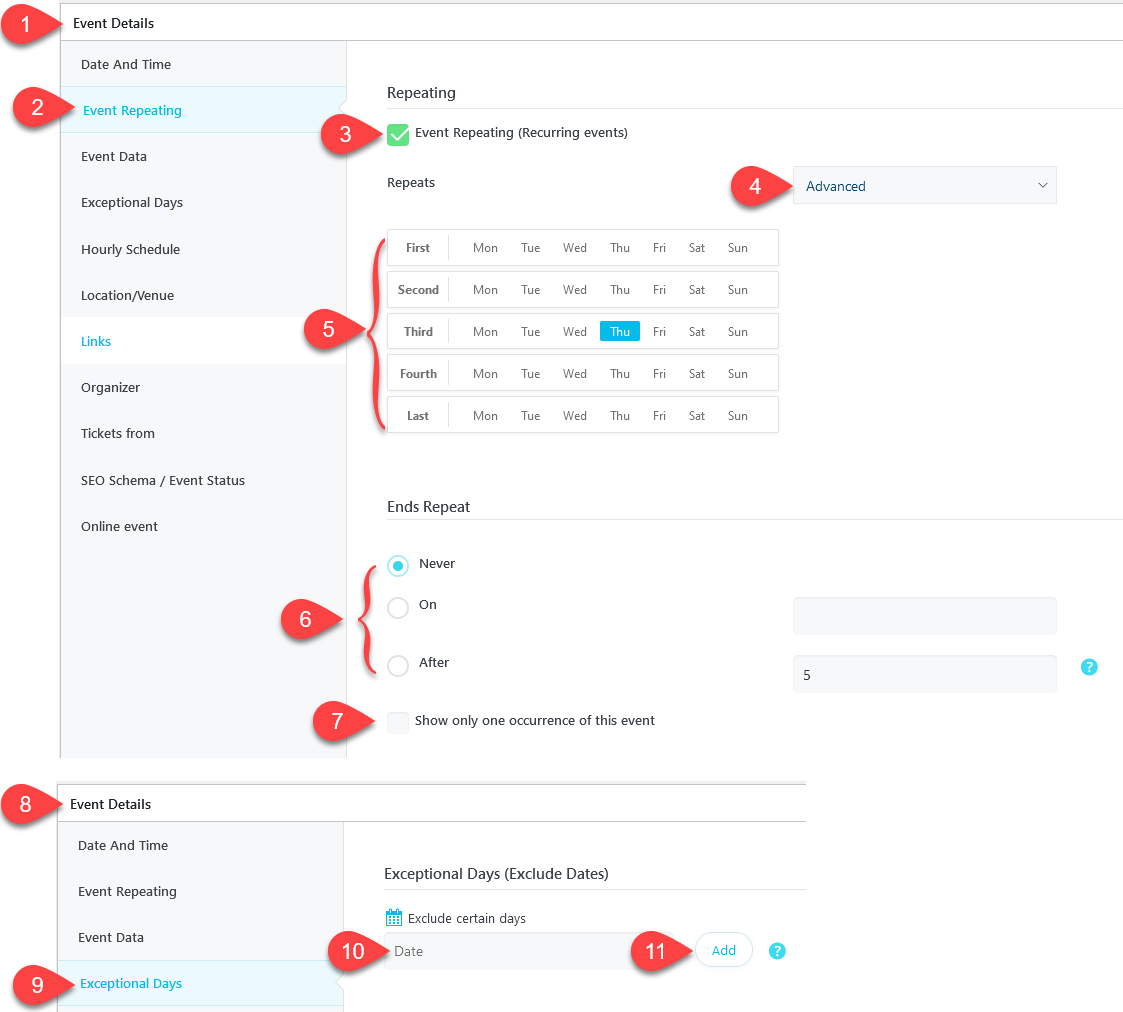
(1) Select Events Details then (2) Event Repeating and tick box (3)
(4) There are several options for the recurrence pattern but for fixed days of the month choose Advanced
(5) This will enable you to choose a fixed day of the month such as the first Monday or third Thursday
(6) Ends Repeat allows you to specify when the recurrence should stop.
-
- Never, will cause the event to roll over perpetually
- On, will cause it to cease after a certain date
- After, will cause it to cease after n occurrences
You can change this setting at any time during the event’s life cycle.
(7) You can limit the event to show only one (the next) item in the What’s On List. It’s not recommended that you do so because if the next occurrence of an event such as an Advice Clinic is fully booked, the customer won’t be able to book a later session until the previous one has passed.
Skipping dates in the cycle
Select Event Details (8) then Exceptional Days (9)
This will allow you to create and maintain a list of dates on which the event will not recur, for example if the venue is closed (10) and (11)
Custom (recurrence)
The custom option allows you to add dates and times that bear no relation to each other at all – they can be completely adhoc
Zoom considerations
Special arrangements apply:
- Individual Zoom meetings must be booked for each session
- The details must not be entered into the event
- Instead they should be sent to the attendees manually a few days before the event
- Zoom’s own recurring meeting function should not be used. This is because recurring Zoom meetings are not listed in the Zoom meetings schedule by date so it is therefore highly probable that a double booking will be made by someone else looking for a meeting slot.
How recurring events appear to the user
The various events list on teh website will show as many events as you have allowed in the setup, terminating after a date, number of occurences or continuimg to infinity if that’s what you want; and also goverened by the ‘show only one occurrence’ setting. So that part of the display is completely under your control and can vary from event to event.
Customer can select what date they want
Even if the ‘show only one occurrence’ setting is enabled, customers can see all occurrences on the booking form and can book any future occurrence, using this drop down. This screenshot is also a good illutration of how random future dates abd times can be when the ‘Custom’ recurrence type is selected.

Bookings
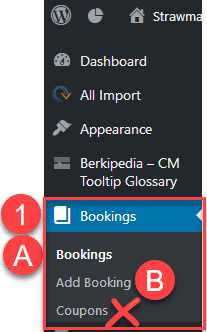 (1) Bookings
(A) Bookings
Here you can review all the bookings that have been made on the system.
Bookings made by Stripe should present few challenges but you scrutinise all bookings that have been made using the Non-card payment option. These bookings will have originated from:
- The Centre, where RA’s have entered a booking on behalf of a phone, postal or face-to-face customer (a proxy booking.) The RA who dealt with the order should have secured payment by cash, cheque or by card using a card machine so no action should be required
- Online, through misuse of the online booking system by customers who have ignored the clearly posted warnings that the only payment method supported for online orders is a card payment via Stripe. The customers were warned online that such orders would be rejected.*
- Before doing so it is advisable to check with the RAs to see if the customer made contact with them.
- If they didn’t then the booking should be rejected. You may decide that the customer should be given the benefit of the doubt and contact them.
- Perhaps they are accustomed to booking on line and paying by chaeque. However, we cannot confirm such a booking until the the cheque has been cleared and you should advise the customer that the tickets may be sold out by the time that happens. Paying by card online is the only way to guarantee a seat
*You may wonder why the non-Card option is present? Wouldn’t it be easier to suppress that option? Unfortunately the non-card option is necessary so that RA’s can enter proxy bookings for face-to-face bookings, and if it’s available for RA’s it’s available for everyone.
(B) Add booking
Techncially it’s possible for the BA to enter a proxy booking in the backend. But there’s little justification for doing so when the RAs can do it in the front end
Reporting
Intro
The reporting options for Events are limited. The most important information about an event is probably the attendee report but you won’t get that here – for that, you must go to Bookings.
When we think of a report we tend to think of a printed version or an export to Excel. The problem with that is that in a dynamic content area such as Events, a report is out of date as soon as it is generated.
For most practical purposes therefore the best place to start is the Events List in the backend dashboard. This is always up to date and much of the information you need can be seen here without printing any reports. You can sort, filter and search, and display a graph of page hits.
The Events List
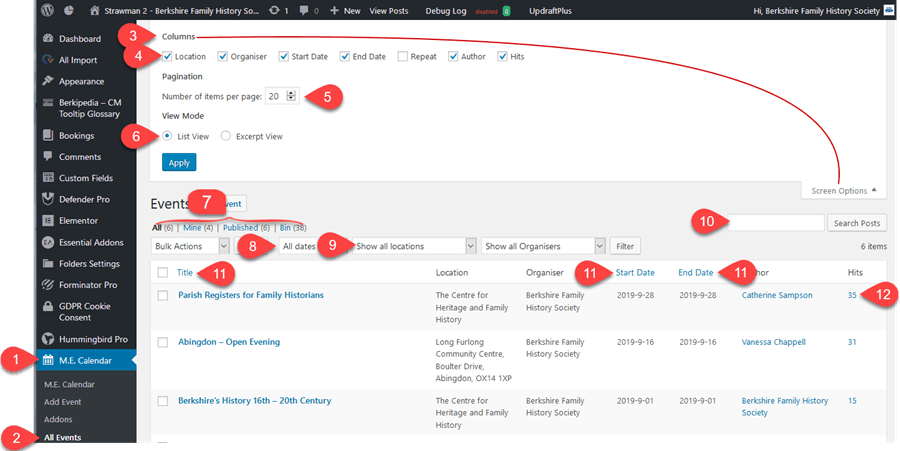
Access
In the Dashboard use options (1) and (2) to access the events list
Screen Options
The screen options section (3) is collapsed by default. You open and close it using the option indicated by the line. You can change the columns displayed in the main list using these check boxes. For example, we have no repeating events in our system so I have chosen to omit that column in row (4).
You can set the number of items to show per page. The default is 20, but you may choose whatever you prefer (5). The system will also default to List View (6). We don’t use Excerpts on our Events, so there is no value in using Excerpt View.
Once you have chosen your preferred settings, collapse this section of the screen to give you more working area.
Quick Filters (7)
This group of quick filters will filter the list to just those items with one click – useful if you want, for example, to see all the events that you have created
Data Filters (8) and (9)
These two filters will display drop down boxes allowing you to choose a month (8) or location (9). Then press the filter button to select the items.
Search (10)
This will search not only the data in teh list but also the underlying events
Column Titles (11 x 3)
These three columns can be sorted into ascending or descending order by clicking once or twice on the column heading
Hits (12)
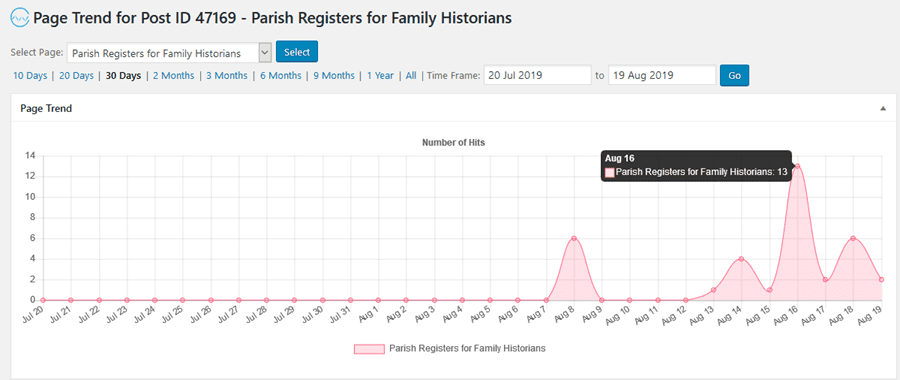
This is a bit funky. Click this number and you will be shown a time line of the page views which you’ll be able to correlate to the bookings to see how many people viewed the page and how many people actually booked a seat.
Creating Excel Workbooks
As well as using the dashboard, it’s also possible to create Excel outputs. For Events, the Excel output offers little that the dashboard doesn’t but if you need a static report of all or a selection of events this is the way to do it.
These are the available fields:
- ID
- Title
- Start Date
- Start Time
- End Date
- End Time
- Event URL Link
- Location
- Organiser
- Organiser Tel
- Organiser Email
- Event Cost
If you want to produce reports of a subset of events, first use the techniques described above to make your selection. Then proceed as follows.
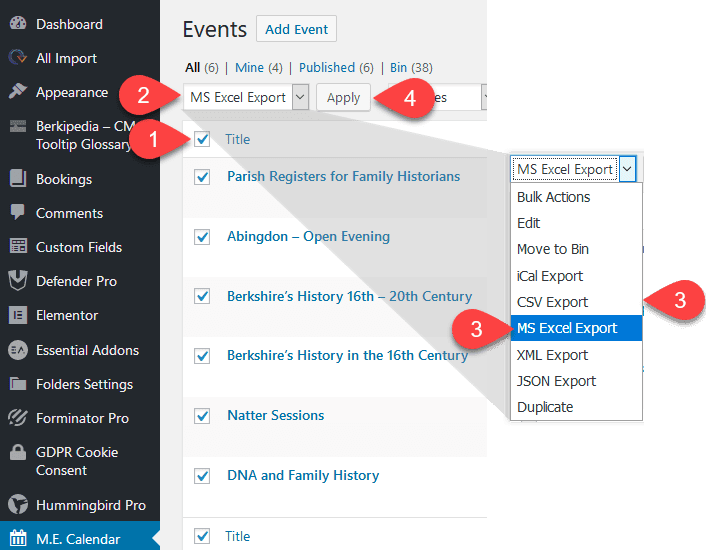
(1) Whether or not you have used a filter, you need to decide which records to include in the Excel Report. To select All (filtered) records, check this box, or if you want to be more selective, check the individual rows instead.
(2) Click here to reveal the drop down and select MS Excel Export (3). (You could also select CSV Export because it produce exactly the same output*). Then press the apply button (4). Your browser will respond with a dialogue box similar to this:
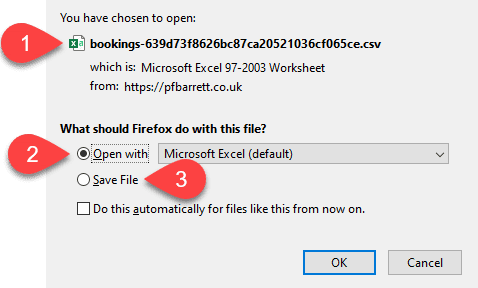
(1) Ignore the fact that this says “bookings.” It is the events list. You’ll notice that the file is a csv file not an xlsx file*
(2) You can choose which app to open the file with. If you have a spreasheet application select that, because the source information is in row and column format which is ideally suited to a spreadsheet
(3) Depending on your operating system, browser and computer applications you may need to download the file and then open it independently,
Now you can use your spreadsheet features to configure the report the way you want it.
Notes:
- The data is in CSV format and your spreadshhet may have issues with the formatting of some columns. e.g. Dates. You will need to apply format types to these columns if you need to sort them
- Special characters are not treated correctly in the imported file*:

*These issues have been reported to the developers.
Intro
The most important information about an event is probably the attendee report and Bookings is where you will find it
When we think of a report we tend to think of a printed version or an export to Excel. The problem with that is that in a dynamic content area such as Bookings, a report is out of date as soon as it is generated.
For most practical purposes, therefore, the best place to start is the Bookings List in the backend dashboard. This is always up to date and much of the information you need can be seen here without printing any reports. But you will need a printed version of the attendee list to use as a checklist at the door and for health and safety purposes.
An exported list has one advantage over the screen view – it will give you a list of email addresses for the attendees
The Bookings List

Access
In the Dashboard use options (1) to access the events list
Screen Options
The screen options section (2) is collapsed by default. For details of how to set screen options, see the Events section.
Quick Filter (3)
The quickest way to see all the bookings for an event is to click an occurrence of the event name in this column.
Data Filters (4) (5) and (6)
You can also select an event using this filter (4). You have the option to selct only those tickets that are confirmed (5). If you do that, the excel report will exclude bookings that have been cancelled.
Creating Excel Workbooks
As well as using the dashboard, it’s also possible to create Excel outputs. For bookings, the Excel output can be used as the attendee list. The available fields are:
- ID
- Event
- Date
- Ticket
- Transaction ID
- Total Price
- Name
- Confirmation
- Verification
- Name (unused)
- Email (unused)
- Terms and Conditions acceptance status
- phone number: for urgent contact
- Customer address (for bookings made offline)
- Access requirements
- Specific food allergies
- Advance information
- Attachments
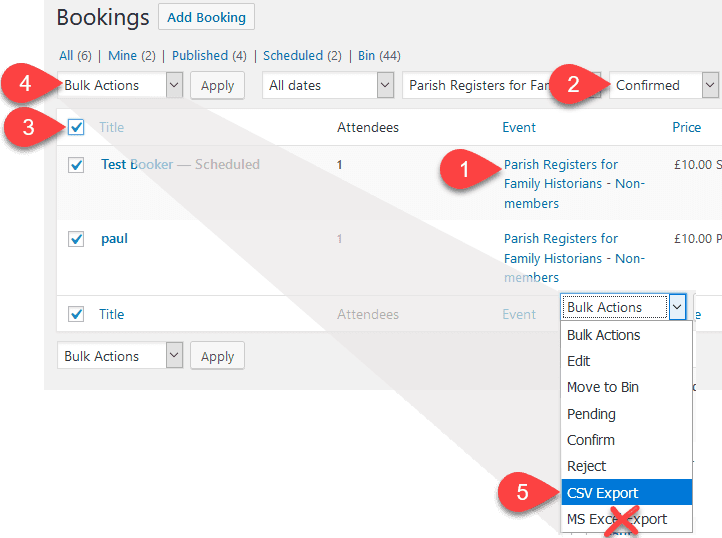
To generate an attendees report, select the event (1) and a confirmation filter if you want one (2)
Whether or not you have used a filter, you need to decide which records to include in the Excel Report. To select All (filtered) records, check this box (3)
(4) Click here to reveal the drop-down and select CSV Export (5). (This differs to the Events report where we used the MS Excel Export option – in this case the CSV export is better.) Then press the apply button. Your browser will respond with a dialogue box similar to this:
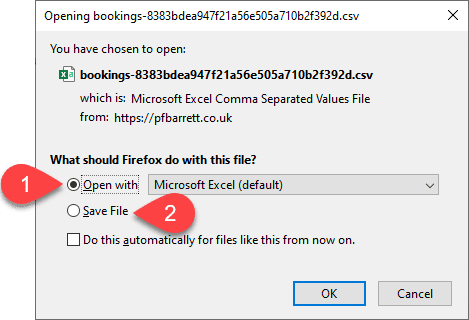
(1) You can choose which app to open the file with. If you have a spreadsheet application select that, because the source information is in row and column format which is ideally suited to a spreadsheet
(2) Depending on your operating system, browser and computer applications you may need to download the file and then open it independently,
Now you can use your spreadsheet features to configure the report the way you want it. Here’s an attendees report with some simple formatting applied:

Notes:
- The data is in CSV format and your spreadsheet may have issues with the formatting of some columns. e.g. Dates. You will need to apply format types to these columns if you need to sort them
- In this example, rejected bookings are included. This is your choice but it might be useful to list rejected bookings, in case the person attends for some extraordinary reason!
*These issues have been reported to the developers.
Cancelling an event, refunds etc
When an event has to be cancelled, the temptation is to move the event to the bin. Please don’t. The original event is indexed by Google etc and binning it creates a search engine optimisation problem which harms our search engine reputation.
Instead, edit the event and then do this:
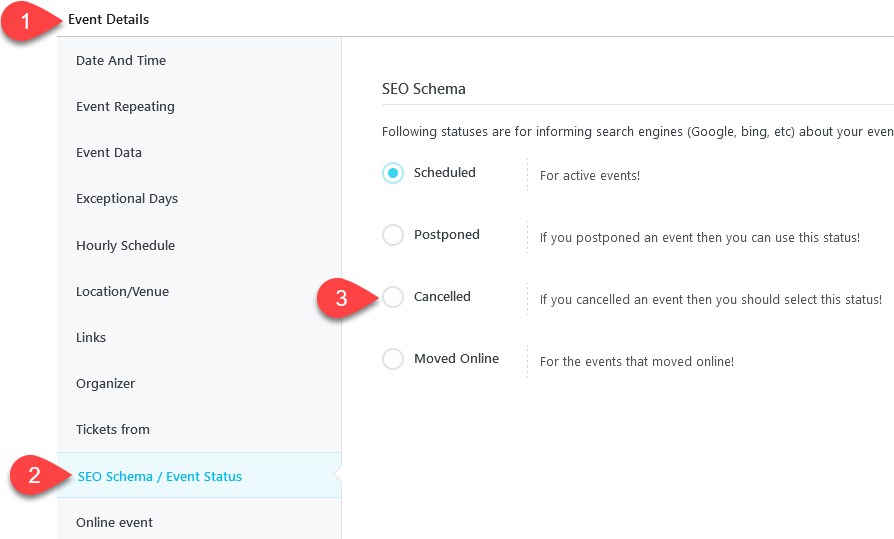
Then save the changes. This will mark the event cancelled on our calendar, and update the search engines.
If bookings have to be cancelled and refunds are necessary, the first and preferred option is to issue a coupon to use against a future booking. There are two reasons:
- To save money – when we issue a credit card refund we still have to pay the original Stripe charges. If they rebook, we will have to pay charges for the new booking too.
- For customer retention – If we issue a refund they may never rebook. A coupon obliges them to book another event, and avoids Stripe charges.
Because payment was made in WooCommerce, that is where the coupon must be created. Creating coupons requires some knowledge of WooCommerce so is best done by the webmasters. Please email us the following information:
- The £ amount of the coupon
- The date the coupon should expire. This need to not be a short date if you don’t want it to be but we mustn’t have open ended coupons. 6 – 12 months is probably best
- A list of the email addresses of the people to whom the coupon is to be made available – you can get that from the bookings list for the event
We will reply with a coupon code that you can send to the customers. They need to enter this code during checkout. It’s best you do this because you’re best placed to reply to any further questions.
Refunds should beconsidered on their merits based on our terms and conditions which are:
“Cancellation of a booking
You must notify your intention to cancel by email (booking@berksfhs.org.uk). For a cancellation received two weeks or more before an event, the society will refund any associated payment in full. If advice of cancellation is received less than two weeks before an event date, refund of any payment will be at the society’s sole discretion, dependent on the financial commitment already entered into for that event.
Substitute attendees
A substitute may attend in your place if you are unable to take part in an event for which you have booked a place. These terms and conditions also apply to that individual. If that attendee is not a current society member, they will need to meet any difference in cost of attendance.”
Our “discretion” may extend to issuing a coupon against a future booking but most companies running events will not provide refunds for last minute cancellations or no shows. If our preferred option of a coupon is not appropriate to the circumstances we might issue a refund. You may be able to do this yourself – if not, ask the webmasters to do it for you. In the WordPress dashboard look for the option for WooCommerce. If it exists you can process the refund yourself.
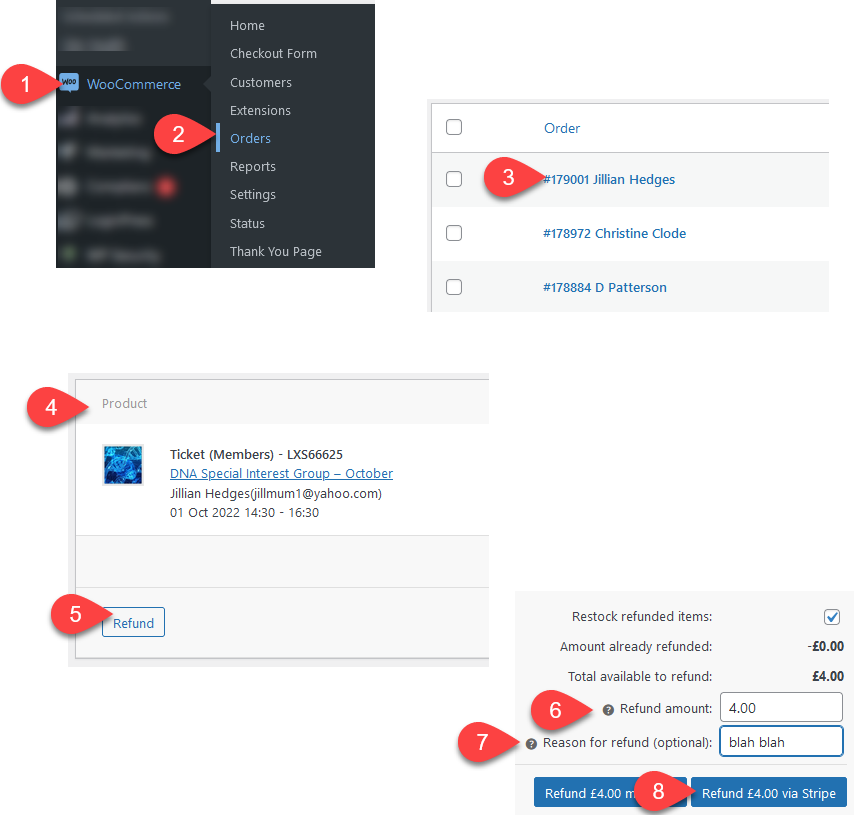
(1) Hover on WooCommerce
(2) Select Orders
(3) Find an click on the order to be refunded
(4) Scroll down to the Product section
(5) Click Refund
(6) Enter the amount to be refunded
(7) Enter the reason for refund
(8) Click to refund
This will:
- cause a refund to be created in Stripe to the original payment card
- cancel any tickets that were booked and release them back into the pool


